Sunday, 10 February 2013

Pentaho Data-Integration (aka. Kettle): SCD Type2


The Type 2 method tracks historical data by creating multiple records for a given natural key in the dimensional tables with separate surrogate keys and/or different version numbers. With Type 2, we have unlimited history preservation as a new record is inserted each time a change is made.

Following are the steps:

 1. Create required tables in database.
2. Insert following Steps with following properties

2.1 Table Input


2.2 Database Lookup


2.3 Filter Rows


2.4 Get System Info


2.5 Add Sequence 2


2.6 Select Value


2.7 Table Output


2.8 Filter row 2


2.9 Dummy(do nothing)


2.10 Execute SQL Script


2.11 Add System Info 2


2.12 Add Sequence


 2.13 Select Value 2


2.14 Table Output 2


3. The overall steps arrangement will be as follows:


4. Save and execute.


Saturday, 5 January 2013

Pentaho Data-Integration (aka. Kettle): SCD Type1

Slowly Changing Dimensions (SCDs) are dimensions that have data that changes slowly, rather than changing on a time-based, regular schedule.

The Type 1 methodology overwrites old data with new data, and therefore does not track historical data at all.

Following are the steps:

1. Create required tables in database.
2. Insert following Steps with following properties

2.1 Table Input


2.2 Database Lookup


2.3 Filter Rows


2.4 Select Value


2.5 Table Output


2.6 Update


3. The overall arrangement will look as follows:


4. Save and execute.

Sunday, 18 November 2012

Pentaho: Configuring Enterprise Console


Console.xml (/home/sumeet/server/administration-console/resource/config)

<?xml version="1.0" encoding="UTF-8"?>
<console>
  <solution-path>/home/sumeet/server/biserver-ce/pentaho-solutions</solution-path>
  <war-path>/home/sumeet/server/biserver-ce/tomcat/webapps/pentaho</war-path>
  <platform-username>joe</platform-username> 
  <biserver-status-check-period-millis>30000</biserver-status-check-period-millis> 
  <homepage-url>http://www.pentaho.com/console_home</homepage-url> 
  <homepage-timeout-millis>15000</homepage-timeout-millis> 
  <!-- comma separated list of roles (no spaces) --> 
  <default-roles>Authenticated</default-roles>
  <default-server-dir>biserver-ce</default-server-dir>
</console>
Web.xml(/home/sumeet/server/biserver-ce/tomcat/pentaho/webapps/web-inf)

<context-param>
                                <param-name>fully-qualified-server-url</param-name>
                                <param-value>http://ctg-BI.srv.citagus.com:8080/pentaho/</param-value>
</context-param>
.
.
.
<init-param>
                                <param-name>TrustedIpAddrs</param-name>
                                <param-value>127.0.0.1,192.168.0.240</param-value>
                                <description>Comma separated list of IP addresses of a trusted hosts.</description>
</init-param>
Hosts(/etc ) or (D:\WINDOWS\system32\drivers\etc\)

# Do not remove the following line, or various programs
# that require network functionality will fail.
127.0.0.1                              localhost.localdomain localhost
192.168.0.240 ctg-BI.srv.citagus.com
::1                           localhost6.localdomain6 localhost6


Thursday, 4 October 2012

PENTAHO: CREATING HYPERLINK


STEP 1: Open report designer. Create a new report.
STEP 2: Drag fields to Item band.
STEP 3: Select the field for which you want to create hyperlink. Right Click on it and select CREATE HYPERLINK option.

STEP 4: Give the URL.
Note: Once you have created hyperlink you can see the automatically generated code in STYLE EXPRESSIONS :
report: SUBSTITUTE("http://images.google.com/images?q={0}"; "{0}"; URLENCODE([EMPNO]))


STEP 5: Save and Run the report.
STEP 6: End.

Saturday, 15 September 2012

PENTAHO: CREATING SUB REPORT


A Sub-report is a report within another report. Following are the steps to create a sub-report in report designer:
STEP  1: Open pentaho report designer. Add a data source.


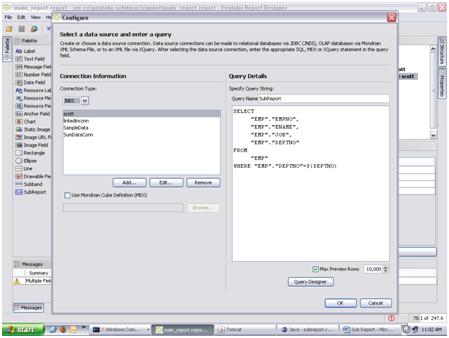
STEP 2: ADD another data source in the same report. Give QueryName as SubReport.

Add caption


STEP 3: Drag the sub Report icon to page.


STEP 4: Set the sub report properties as follows:
FILE PATH: This is the path of the sub report.
QUERY:  Select the query name for the subreport. E.g. subreport.

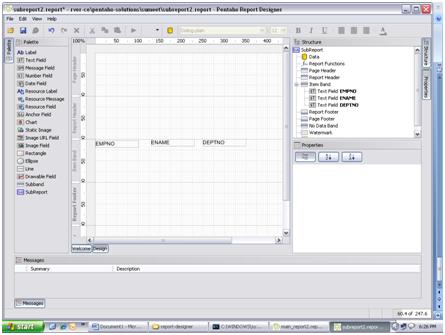
STEP 5:  Now double click on the sub report field and save it with name subreport2.  Another window will be open.


STEP 6:     Drag the fields to page area.


STEP 7:     Run the main project.


Wednesday, 20 June 2012

PENTAHO: DRILL DOWN CHART

-Create one parameterized report in report designer and publish it as xaction.
-Open design studio, create one new java project. Then create one new action sequence and
  Input with parameter name.
-In process Action, select get data from in that select relational. Give the required data base
  connection details, and query same as given in report designer.
-In process Action, click on add, in that report and select pentaho report.
  In report specification, browse and select the xml of the report, in report data select query result. 
  Give the output report name.
-In the process output select the name of output report name and select response. Save the
  xaction and run it.
- now we need to create the main xaction with chart. Create one new xaction,  Process input add
  Input with the same parameter name, select request and give the default value. In the process
  action select get data from, in that relation. Give the required database connection details, and
  write down the query.
-in process action, click on add, select chart in that select chart of your choice. Give chart data as 
 Query_result. Click on toggle tab, in that under configuration add the below tag, i.e. details of link xaction    path
            <urltemplate><![CDATA[/ViewAction?solution=GIVE SOLUTION NAME&path=&action=XACTION
          NAME&PARAMETER NAME={FIELD NAME}]]></url-template> 
          <paramName>GIVE THE NAME(I.E. NAME OF THE PARAMETER FIELD)</paramName> 
           <series-name>GIVE THE SERIES NAME</series-name>
- Save and run the xaction.


Saturday, 26 May 2012

Pentaho: Parameterized Report


Step 1: Add a new Data Source.
Step 2: Add two queries
Query 1:
SELECT
     "EMPLOYEES"."EMPLOYEENUMBER",
     "EMPLOYEES"."FIRSTNAME",
     "EMPLOYEES"."JOBTITLE"
FROM
     "EMPLOYEES"
Where "EMPLOYEES"."EMPLOYEENUMBER"=${ENO}
Query 2:
SELECT
     "EMPLOYEES"."EMPLOYEENUMBER"
FROM
     "EMPLOYEES"

Step 3: Add a parameter. Set the properties.


Step 4: Run the report.

Saturday, 18 February 2012

Pentaho: Passing Parameter from JSP to Pentaho Report


Pentaho provides different API’s, which can be used in JSP pages. We can easily pass parameter from a JSP page to Pentaho reports using these APIs. Below are the steps

1. Create a .xaction file in design studio.
2. Add a Process Input as NAME.
3. The query will be as follows:

      SELECT  "EMP"."EMPNO", "EMP"."ENAME", "EMP"."SAL", "EMP"."DEPTNO"
      FROM    "EMP" where  "EMP"."ENAME"={NAME}

4. Create a HTML file with following code:

<HTML>
<BODY BGCOLOR="pink">
<br><br><br><br><br><br><br><br>
<Center>
<FORM ACTION="http://localhost:8080/pentaho/sumeet_session" METHOD=post>
ENTER YOUR NAME : <INPUT TYPE="TEXT" NAME="NAME" SIZE=20>
<P><INPUT TYPE="SUBMIT" value="Submit">
</FORM>
</center>
</BODY>
</HTML>

5. Create a JSP (sumeet_session.jsp) page with following code:

<%@ page import=
"java.util.Hashtable,
 java.util.Calendar
,java.util.Date
,java.util.Vector
,java.sql.*
,java.text.SimpleDateFormat
,javax.naming.Context
,javax.naming.InitialContext
,javax.sql.DataSource
,java.util.*" pageEncoding="UTF-8"%>
<%@ page language="java"
                import="java.util.ArrayList,
                java.util.Date,
                java.io.ByteArrayOutputStream,
                org.pentaho.platform.util.web.SimpleUrlFactory,
                org.pentaho.platform.web.jsp.messages.Messages,
                org.pentaho.platform.engine.core.system.PentahoSystem,
                org.pentaho.platform.uifoundation.chart.DashboardWidgetComponent,
                org.pentaho.platform.web.http.request.HttpRequestParameterProvider,
                org.pentaho.platform.web.http.session.HttpSessionParameterProvider,
                org.pentaho.platform.api.engine.IPentahoSession,
                org.pentaho.platform.web.http.WebTemplateHelper,
                org.pentaho.platform.util.VersionHelper,
                org.pentaho.platform.util.messages.LocaleHelper,
                org.pentaho.platform.engine.core.solution.SimpleParameterProvider,
                org.pentaho.platform.engine.services.solution.SolutionHelper,
                org.pentaho.platform.uifoundation.chart.ChartHelper,
  org.pentaho.platform.web.http.PentahoHttpSessionHelper"
                 %>

<HTML>
<BODY>
<%
   String name = request.getParameter( "NAME" );
   session.setAttribute( "NAME", name );
%>
<%
                  response.setCharacterEncoding(LocaleHelper.getSystemEncoding());
                String baseUrl = PentahoSystem.getApplicationContext().getBaseUrl();
                IPentahoSession userSession = PentahoHttpSessionHelper.getPentahoSession( request );
                  HttpRequestParameterProvider requestParameters = new HttpRequestParameterProvider( request );
                HttpSessionParameterProvider sessionParameters = new HttpSessionParameterProvider( userSession );
                SimpleParameterProvider parameters = new SimpleParameterProvider();                                           
                // pass the NAME to the report
                parameters.setParameter( "outputType", "html" );
                  parameters.setParameter( "NAME",name);                  
                // create an output stream for the report content
                ByteArrayOutputStream outputStream = new ByteArrayOutputStream();
                ArrayList messages = new ArrayList();
                // run the action sequence 'samples/dashboard/jsp/report.xaction'
       SolutionHelper.doAction("SessionPara","","session_para.xaction","sumeet_session1.jsp",parameters,outputStream,userSession,messages, null ) // write the report content into this page
  out.write(outputStream.toString());
%>

</BODY>
</HTML>

6. Save the jsp file at following location:
biserver-ce\tomcat\webapps\pentaho\jsp

7. Make the required changes into web.xml file.
8. Run the html file.


9. Enter the name in text box and click submit button.


Hope this article will make your task easier.